|
What you'll need
Step 1: Look through Pinterest, Instagram and Etsy at designs and wall hangings and search for inspiration for a design or colour pallet. You can also you google images to find an image that inspires you to recreate it in an abstract fashion for the wall hanging. Step 2: Roam your local park, yard or beach and find a piece of driftwood, or stick that is smooth. While doing this you can also search for other decorations such as seashells, starfish, gum nuts, flowers or feathers to add an extra touch of special to your design. Step 3: Visit your local frames markets and purchase good quality, ethically produced and manufactured wool and silk fibres in a range of colours, thicknesses and textures. Remember the more variety the better. Step 4: To create your loom, start by adding the warp to the wooden frame. The warp is a set of lengthwise strings that are held, in tension, on a frame. This frame is what you'll be weaving onto. As the warp is wound tightly around the frame, the yarn should be strong and not too thick or too thin. Tie the end of your string into a double knot, onto the bottom left of the frame. Loop the string under and over the top of the frame and back down under and over the bottom of the frame. Continue making a figure eight pattern each time. Step 5: Depending on how wide you want your piece to be and how big your frame is, you can make as few as 10 loops and as many as 25. Separate the strings about 0.6 centimetres apart from each other and make sure the tension is even and tight, but not too tight, before tying a knot at the top of the frame. Step 6: Double check your loom from the side. The strings should be criss-crossed around the middle of the loom. Take the thin wooden dowel, which will serve as your shed rod, and slide it through the strings – under where the strings are crossed. Then push it to the top of the frame. You’ll immediately notice that the tension is tighter. The shed rod helps separate the upper and lower warp strings, making it easier to weave! Step 7: This is what your loom should look like. Notice how the warps criss-cross above the shed rod. The strings are evenly separated. And there is clear separation of a top layer of strings (top warp) and a bottom layer of strings (bottom warp). You are ready to weave! Step 8: The weft is the term for the yarn which is drawn horizontally through the warp to create a weaving. For this, I like to use a variety of natural fibre yarns – some thick, some thin, some with interesting textures. It’s all about mixing it up! Cut the yarn to about 6-7 metres. Thread the end of the yarn through the needle. Starting a few centimetres from the bottom of the loom, pass the needle under the bottom warps. That means under every other warp: over the first warp, under the second warp, over the third warp, under the fourth warp and so on. Step 9: Pull the yarn straight through, leaving a 10-12 centimetre tail. Pull the right side of yarn down towards the bottom of the loom, creating a small arc in the yarn. Step 10: Use a fork to comb down the middle of the arc. Then the left and right sides, pressing the rest of the weft into a straight line. Step 11: Giving the weft extra slack with an arc allows it to be packed into place with even tension. This action provides overall consistency to your piece. It’s an important step and shouldn’t be skipped after each weft is passed through! Now wrap the yarn around and under the last string. Step 12: And bring it back through – this time through the top warps. Under the first, over the second, under the third and so on. Passing the yarn through the top warps should be easier than passing it through the bottom. This is because you’re not working with tension when weaving through the top warps. Step 13: Use the fork to press down the second row so that it is snug against the first. Repeat by going back through the bottom warps. Step 14: After a few rows, you can cut the yarn to leave a 10-12 cm tail. Or just continue weaving. If you run out of yarn, I’ll explain how to add more yarn later in the tutorial. I’ll also be showing you how to finish those loose tails at the very end. Step 15: To add tassels, cut a bunch of yarn double the length of the desired tassel length. Take a group of 3-5 strands, depending on the thickness of the yarn, and centre it under the first set of top and bottom warps. Step 16: Slide a finger under the middle of the yarns, between the two wefts. Pull the centre up, creating a loop. Step 17: Grab the ends from under the loop and pull tight. Step 18: Slide the tassel down and repeat. Step 19: If the yarn runs out while plain weaving, just drop the yarn behind the loom. Be sure to drop it with at least a few centimetres of slack. Bring up a new piece of yarn, as if to continue the weft. Step 20: Create the arc as normal and press down with your fork. I’ll show you how to take care of the loose ends on the backside towards the end of the tutorial. Step 21: There might be a place where you decide to break up your weaving with tassels or sections of varying yarns. To plain weave just a small section, simply continue to weave as normal. Step 22: When you want to turn back simply wrap the yarn around the last warp and weave through the opposite set of warps. It doesn’t matter if it wraps around a bottom or top warp – as long as you return the yarn back in the other direction through the opposite set of warps. Create a small arc. Step 23: And press down with the fork. Go back through and take it a few warps further if need be. Step 24: Make an arc and press down. Easy peasy. Continue weaving! Weaving Skills Soumak Fishtail Weaving Technique One weaving technique I love is the soumak, which looks similar to a fishtail braid. To do this, you wrap the yarn around each warp from the right side. And then back through around the left side of each warp. Place the needle under the first warp from the right side of the warp. Wrap the yarn around it and pull until you have a few inches of slack. Then wrap the yarn around the second warp – again, from the right side. Pull. Then wrap around the third warp and so on . . . Once you reach the end, mirror the technique – this time, wrapping yarn around each warp from the left side. Cut the yarn, leaving slack. Wool Roving Stitch Wool roving is super soft wool that has not yet been spun into yarn. It usually comes in long, thick bundles that are easy to pull apart and manipulate. Incorporating roving into your weaving is super easy – just treat it as yarn and pass it through like a plain weave. Under the top warps first. And back under through the bottom warps. When you’re finished, simply give the roving a hard pull on each side and it will naturally separate. Again, be sure to leave some slack! Continue weaving until you’ve reached the top. To finish all the yarns dropped off the back and the ends, turn the loom around. Thread the extra slack through the needle and tuck it under a series of 3 wefts, lengthwise. Trim with a pair of scissors. To hide the ends, thread the slack through the needle and tuck the thread through a series of 3 wefts, lengthwise, down the edge of your weaving. Trim. With roving, simply weave the ends through the warps on the backside, tucking it under every other warp. Taking the Weaving off the Loom To take the weaving off the loom, carefully snip the warps that are wrapped around the top of the loom – one at time. Tie each set of warps into a square knot. Continue snipping and knotting until the entire piece has been removed from the top of the loom. Repeat the process at the bottom of the loom. Hide the warp strings the same way you did with the yarn. Thread each section through the needle and pass it through a series of wefts. Trim and repeat the steps on the bottom. To hang the weaving, select either a metal rod or wooden stick that measures a few inches wider than your piece. I use pieces of driftwood and sticks. Thread a 60 centimetre piece of yarn through the warp and over the mount. Tie into a double knot. And back through the second set of warps, around the mount and back through the third set of warps. Continue until you’ve reached the end. Tie into a knot and snip away any excess. Adjust with your fingers so the weaving lays evenly across the bottom of your mount.
0 Comments
What you'll need:
Step 1: Begin your journey into 3D embroidery by searching for inspiration on Pinterest, Instagram. Find the image/design that motivates a vision for your own 3D hair embroidery design. I tend to enjoy recreating hair dos from weddings or finding images of beautiful braids and messy buns to really capture the candidness of life in needle and thread. Step 2: Source a piece of woven cotton or canvas, a bamboo embroidery hoop and 3 DMC thread colours that can be used for the hair. I try to find at least 3 different shades of brown, or blonde or red to increase the realism of the hair pieces, as natural hair is never just a solid colour. These items can be purchased from your local Spotlight Store at a reasonably low price and are ethically produced and manufactured. Step 3: Take your canvas fabric and place it flat on a table. Take your embroidery hoop and unwind it so it separates into 2 circles. Place the smaller ring on the underside of the canvas fabric and take the larger ring and place it on top of the fabric. Push the larger ring down over the smaller ring and tighten the screw at the top. Now you are ready to begin your design. Step 4: Take a lead pencil or washable marker and draw a simplistic outline of your figure and hair style so you can determine the size and scale of the design. Once that is complete, it's time to take your needle and thread and get to work. Step 5: Using the simple back stitch technique, with your chosen DMC embroidery thread colour, outline the shape of the figure first. I like to do this to begin with as there are less threads hanging around and getting in your way and it also ensures that there will be no gaps in the human figure if the hair does not cover the body entirely. Step 6: Take your coloured threads for the hair and roughly measure against the design how long you want the hair ensuring that you fold the strand in half. Step 7: Once you have the correct measured length, go ahead and cut around 8 of the same lengths for each coloured strand. Start by separating the DMC thread into groups of 3 individual threads. Take your needle and insert the DMC thread through it. Step 8: Start by taking your needle and thread through the front of the fabric. Leave the thread hanging on the front and take the thread back through the front of the fabric without pulling the thread all the way through the fabric. Release the needle from the thread and even the ends by adjusting the length of the threads. Step 9: Repeat step 8 until the area that is to be covered in hair is covered with luscious locks of embroidery thread. Now its time to begin styling the hair. The styling of the hair can be done however you want - it can be curled, braided, put into a messy bun, the possibilities are endless. This step requires study of the hairstyle chosen to be able to be successfully completed. 
|
AuthorJust an ordinary girl with a passion for gorgeous textures and contemporary textiles. ArchivesCategories |


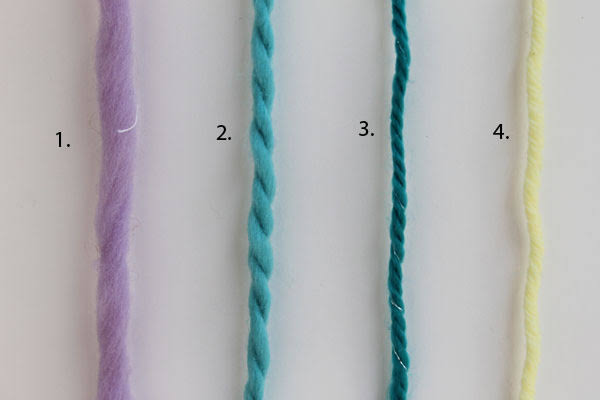
 RSS Feed
